- Best Hangboards For Every Skill Level
- Hangboard For Health
- Hangboard Workouts
- Pulley Systems For Hangboard
- Why Hangboard?
- Does Hangboarding Actually Improve Climbing?
- But You Actually Can’t Strengthen Your Fingers
- Pulleys: The most common finger injury
- What does this mean for climbers and hang boarding?
- Preventing Injury
- Proper Hangboard Form
- Types Of Hangboard Grip
- Hangboard Before Or After Climbing?
- How To Choose A Hangboard
- How To Hang A Hangboard
- Conclusion
Is your local gym or crag still closed? Or, maybe they will be opening soon!
Want to get come back stronger than ever?
Keep reading for 9 complete hangboard workouts (screenshot the PDFs below) from novice to advanced.
Hangboarding is one of the most space-efficient, social-distancing qualified, and time-efficient ways to improve finger strength.
Implementing a regular hangboard routine into your climbing training can help you push through plateaus and crush your projects.
Keep in mind, however, it’s harder than it looks and can lead to injury if done improperly. Read on to learn more.
Let’s take a look at hangboarding in-depth so that you can get back to your project with crushing strength to spare.
Best Hangboards For Every Skill Level
- Best Beginner Hangboard: Metolius Project
- Best Intermediate Hangboard: Trango Rock Prodigy
- Top Expert Hangboard: Beastmaker 2000
- Slopers & Pinches: So ill Iron Palm
- Travel Hangboard: Awesome Woodys Cliff Board
- Best Budget Hangboard: Metolius 3D Simulator
- Best Wooden Hangboard: Beastmaker 1000
Hangboard For Health
Hangboards, often called ‘training boards’ or ‘fingerboards,’ are everywhere and gaining popularity among climbers.
Maybe you’ve watched people grunting on the hangboard wall at the gym or know someone with a hangboard/campus board at home.
Learn more about the difference between Hangboards, Campusboards, Moonboards, and Kilterboards here.
Probably you’ve seen the pictures of Alex Honnold hangboarding in his van or heard the story of Canadian superman Sonnie Trotter sending his 5.14 project after a season of almost exclusively hang board training.
All this might get you wondering, “Why hangboard?”
Obviously it works if all the elite climbers do it. But why and how?
First, here are a few example hangboard workouts from beginner to expert.
Hangboard Workouts
Below, you will find hangboard workout cards for each skill level. Take a look. Screen shot them, save them or share them, but be sure to read the entire article before trying one of these workouts.
Do not confuse ‘Beginner’ hangboard workouts with workouts for beginner climbers. New climbers should not be doing hangboard workouts. You will get injured.
The right time to start hangboard training is once you can consistently climb at or near 5.11 or when the hold difficulty, rather than strength or footwork/technique, is limiting your progress.
The workouts below do not feature pinch grip exercises. This is because not all hangboards have pinches.
If you do have a hang board with pinches, substitute a pinch hold for sloper or large edge holds in the workouts below.
Done right, hangboarding will propel you to new heights. Done wrong, it will leave you grounded with hard to mend injuries.
Beginner Workouts
Here are 3 Beginner workouts. They progress from an intro workout for newbies to a more difficult but still low difficulty workout for more experienced beginners.
Even if you have been climbing for a while but have never focused on finger strength, start with the intro routine or similar. Easier is better to start.
For beginners having trouble hanging from even the largest holds or jugs, you might consider a pulley system. You can learn more about the mechanics of this system below.
Essentially, you make yourself lighter by adding weight to the system–making it easier to hang from the holds. This is a useful tool for beginners to build finger strength and confidence.
It can also be used as you move into higher-level hangboarding to progress to smaller and smaller holds.
If you don’t have access to a pulley set-up, try putting a foothold on your door jam or using a small step stool.
Place your feet on the hold or stool slowly putting less and less weight on your feet until you find the sweet spot where you can hang but with some difficulty.
Minimum Edge Training
You might have heard the phrase, ‘Minimum Edge Training,’ (popularized by climbing researcher Eva Lopez of Transgression hangboards), or ‘Deadhang Repeaters.’ For beginner purposes, they are essentially the same thing.
Minimum edge training is one of the best ways to get started hangboarding.
Training guru Eric Horst gives a succinct explanation in the video below.
Find the correct sized edge for you using the method suggested in the video (@ 2:05). Here is the minimum edge workout presented in the video in an easy to follow infographic.
Following that, you will find Beginner Hangboard Workouts #1-3.

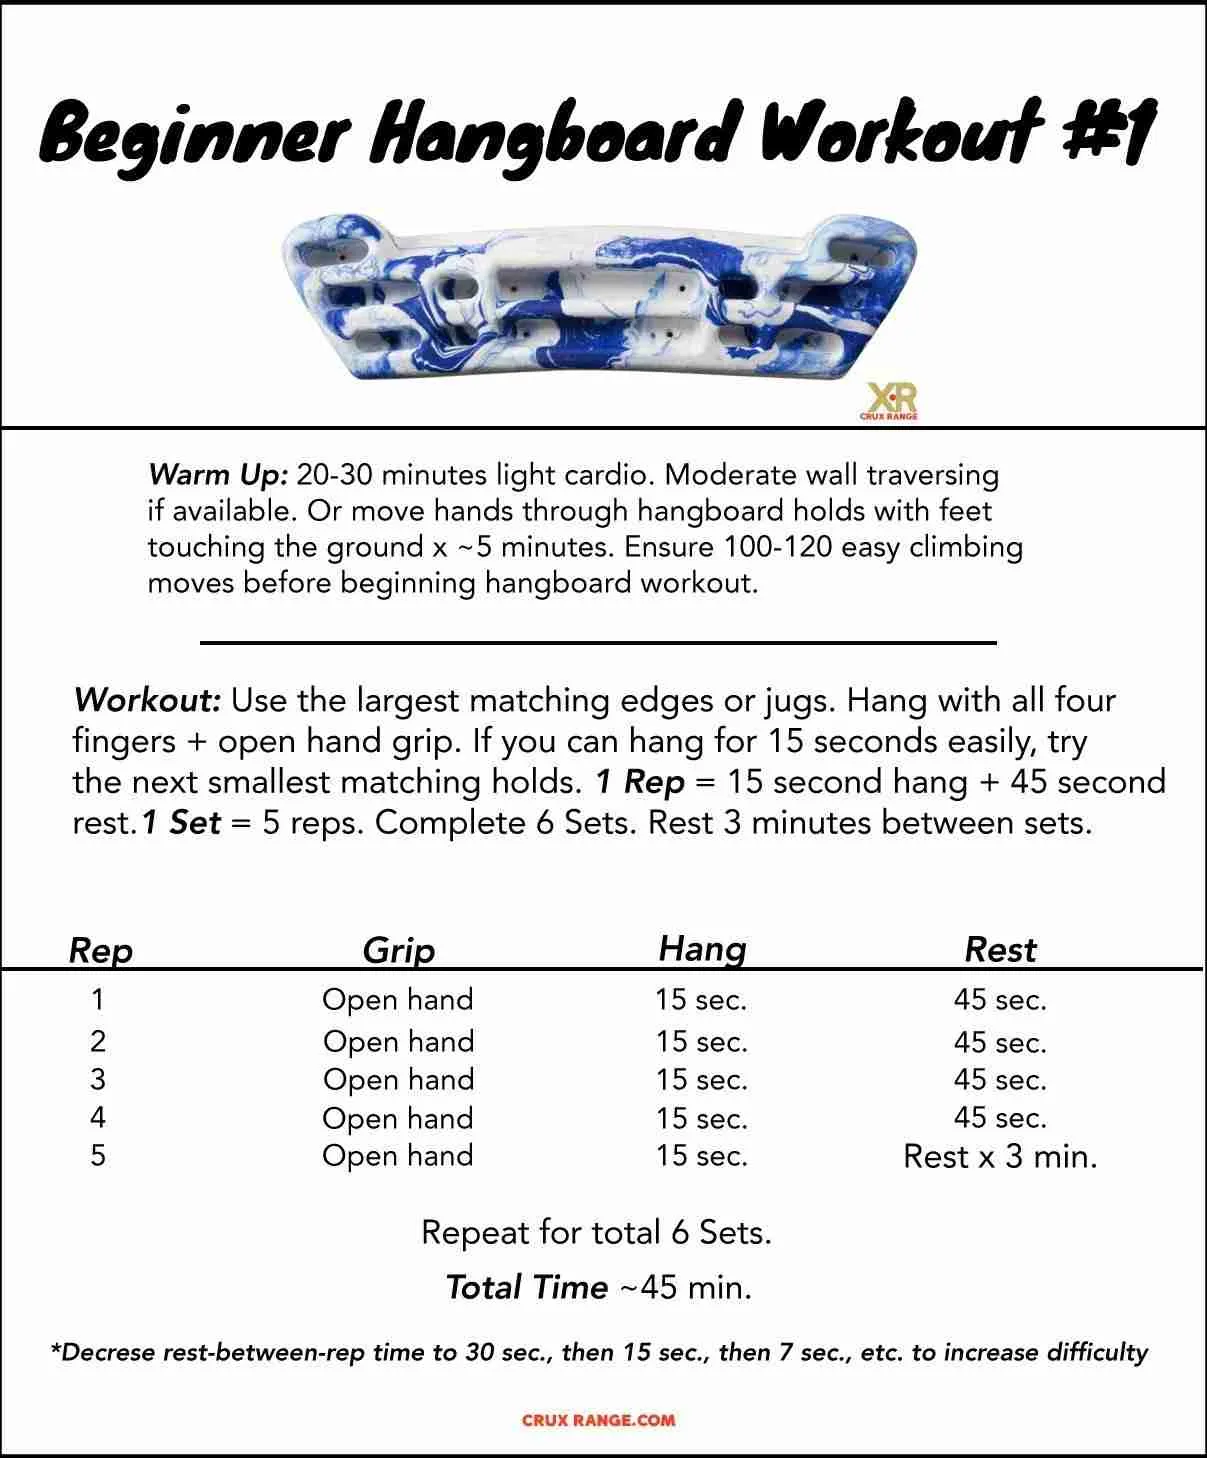
Beginner Workout #1
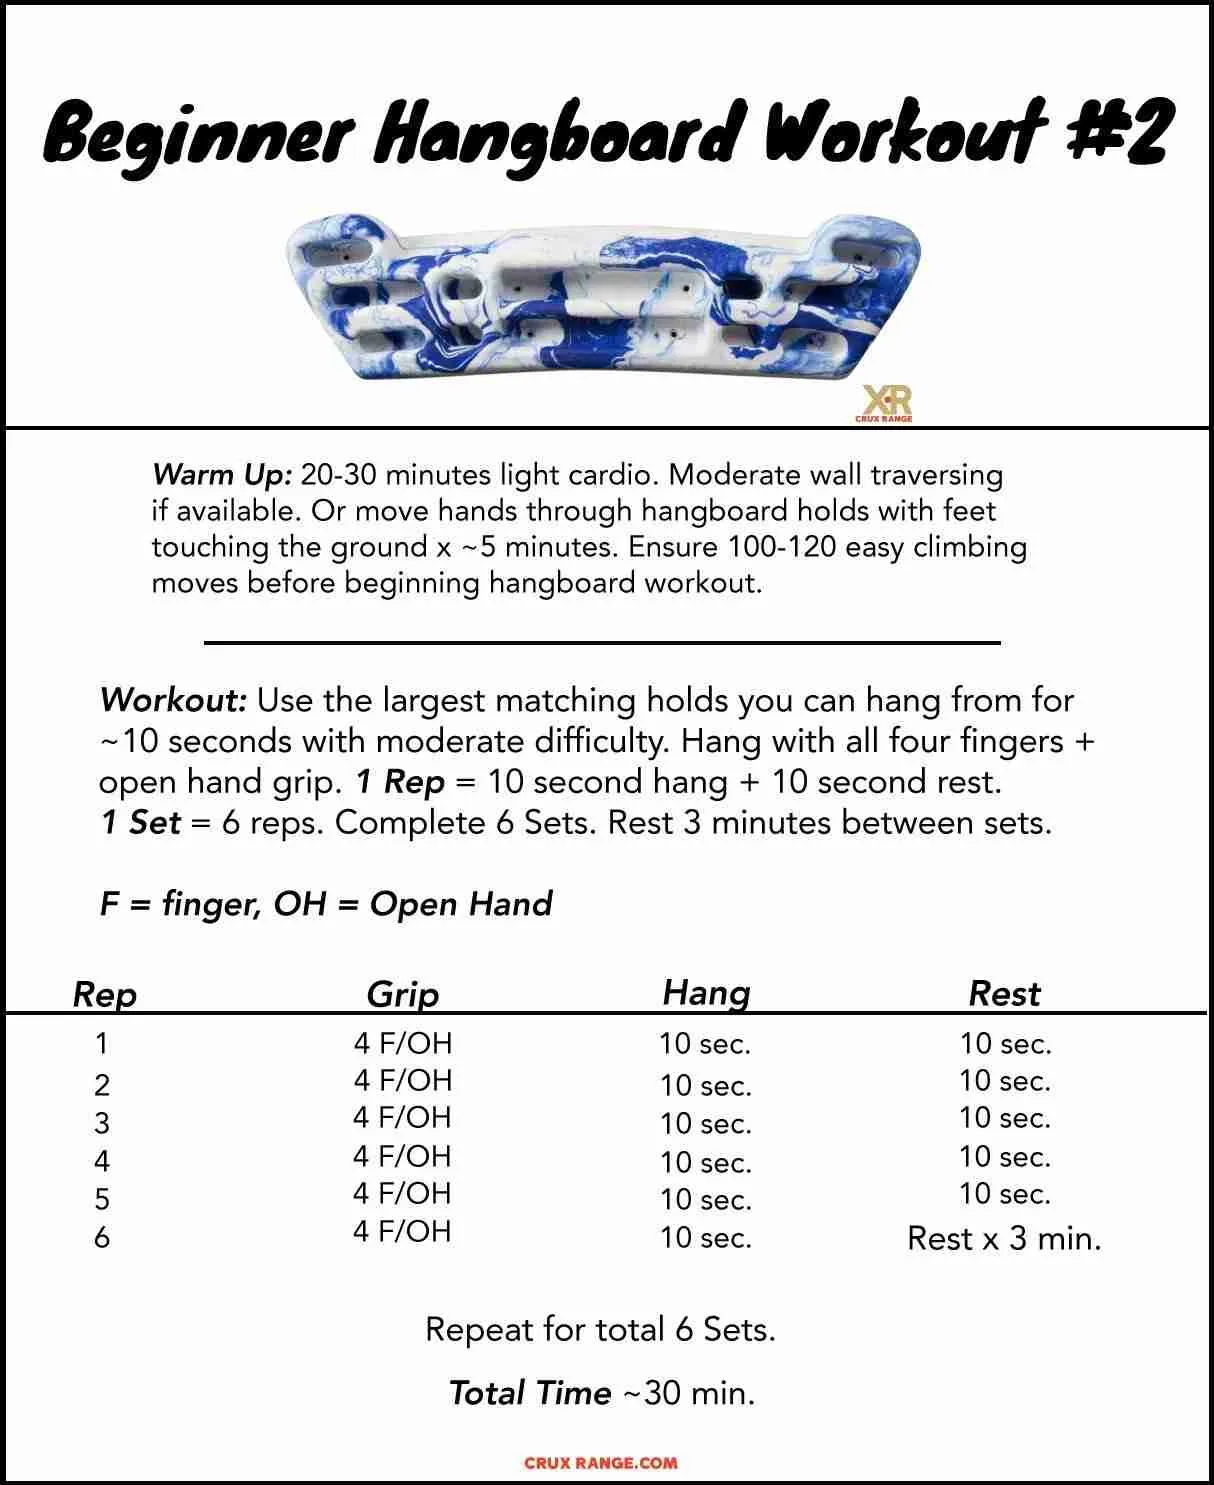
Beginner Workout #2
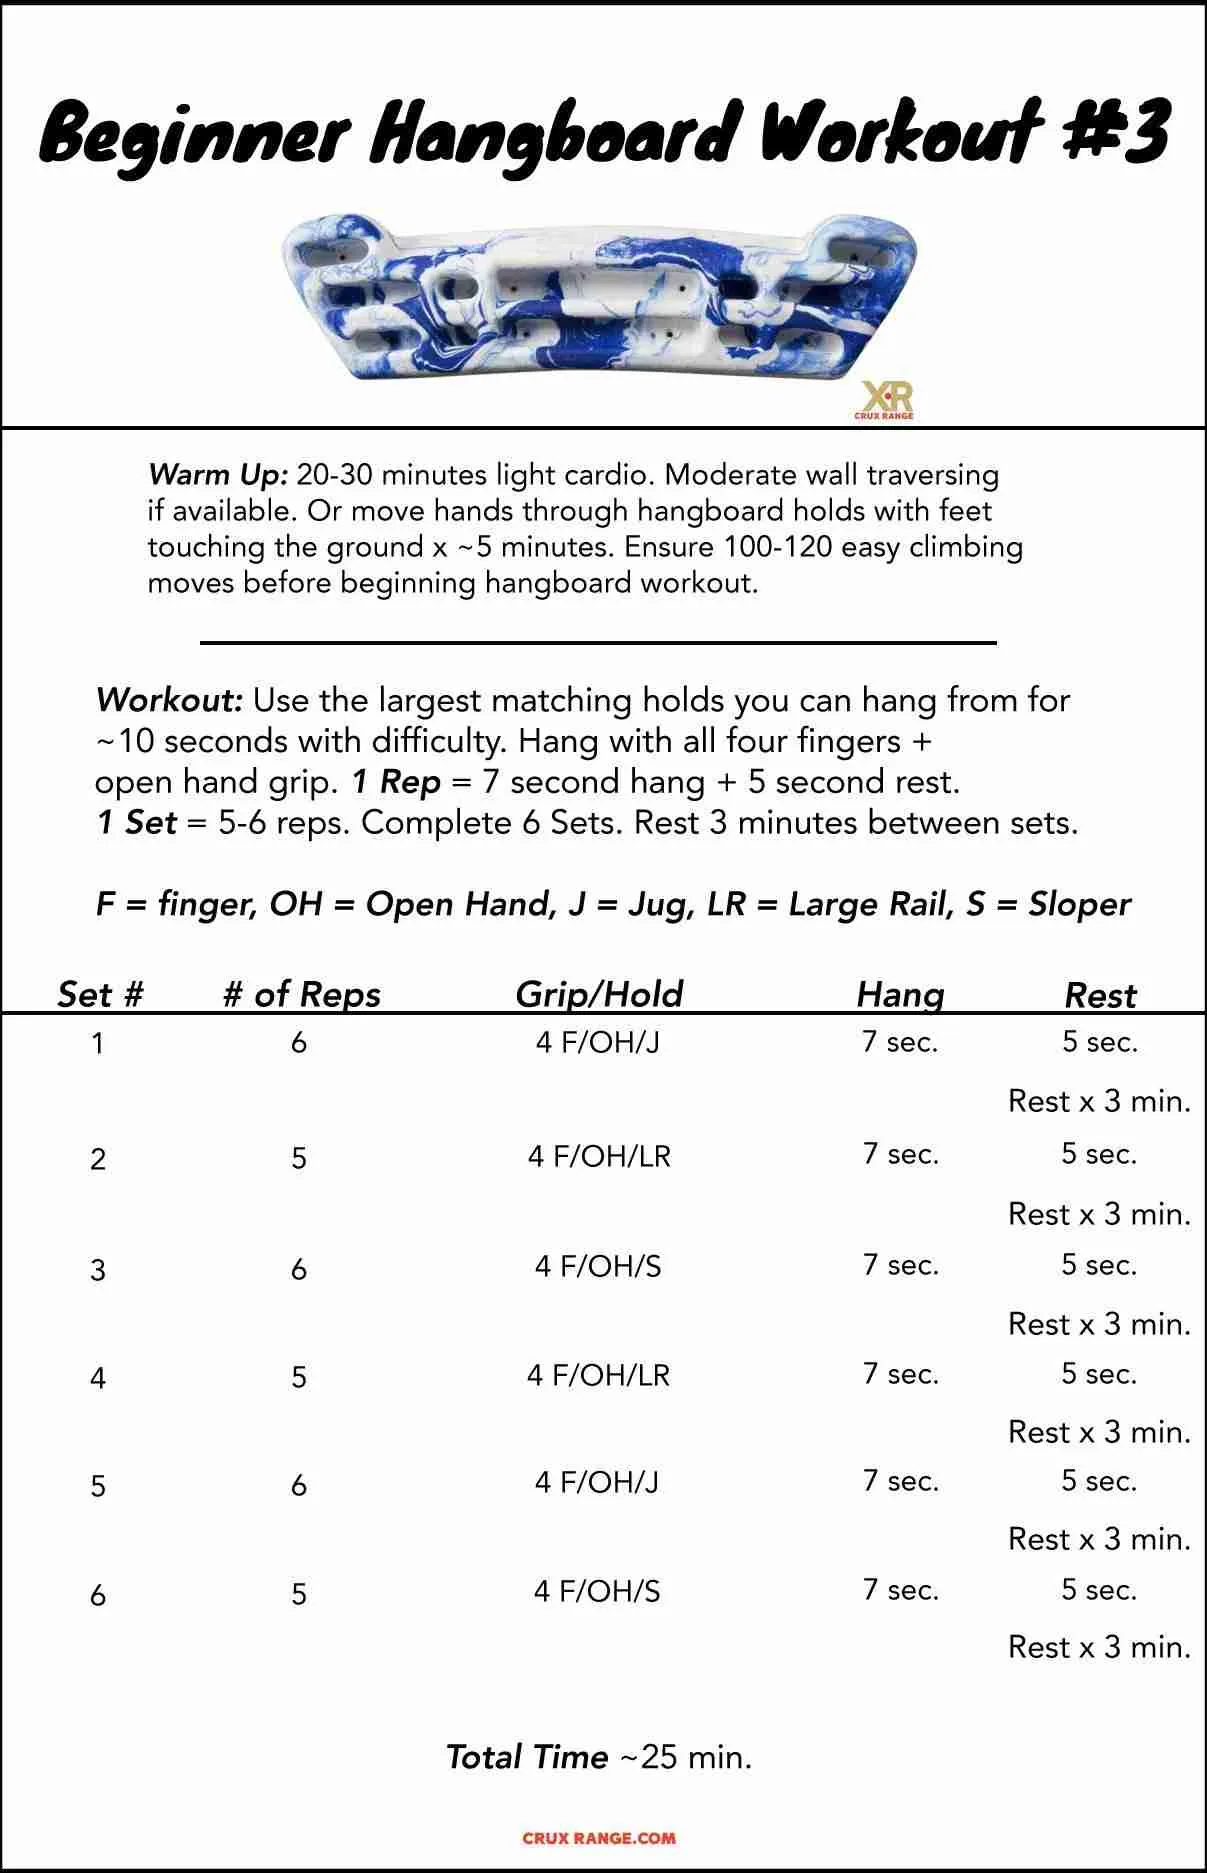
Beginner Workout #3
Intermediate Workouts
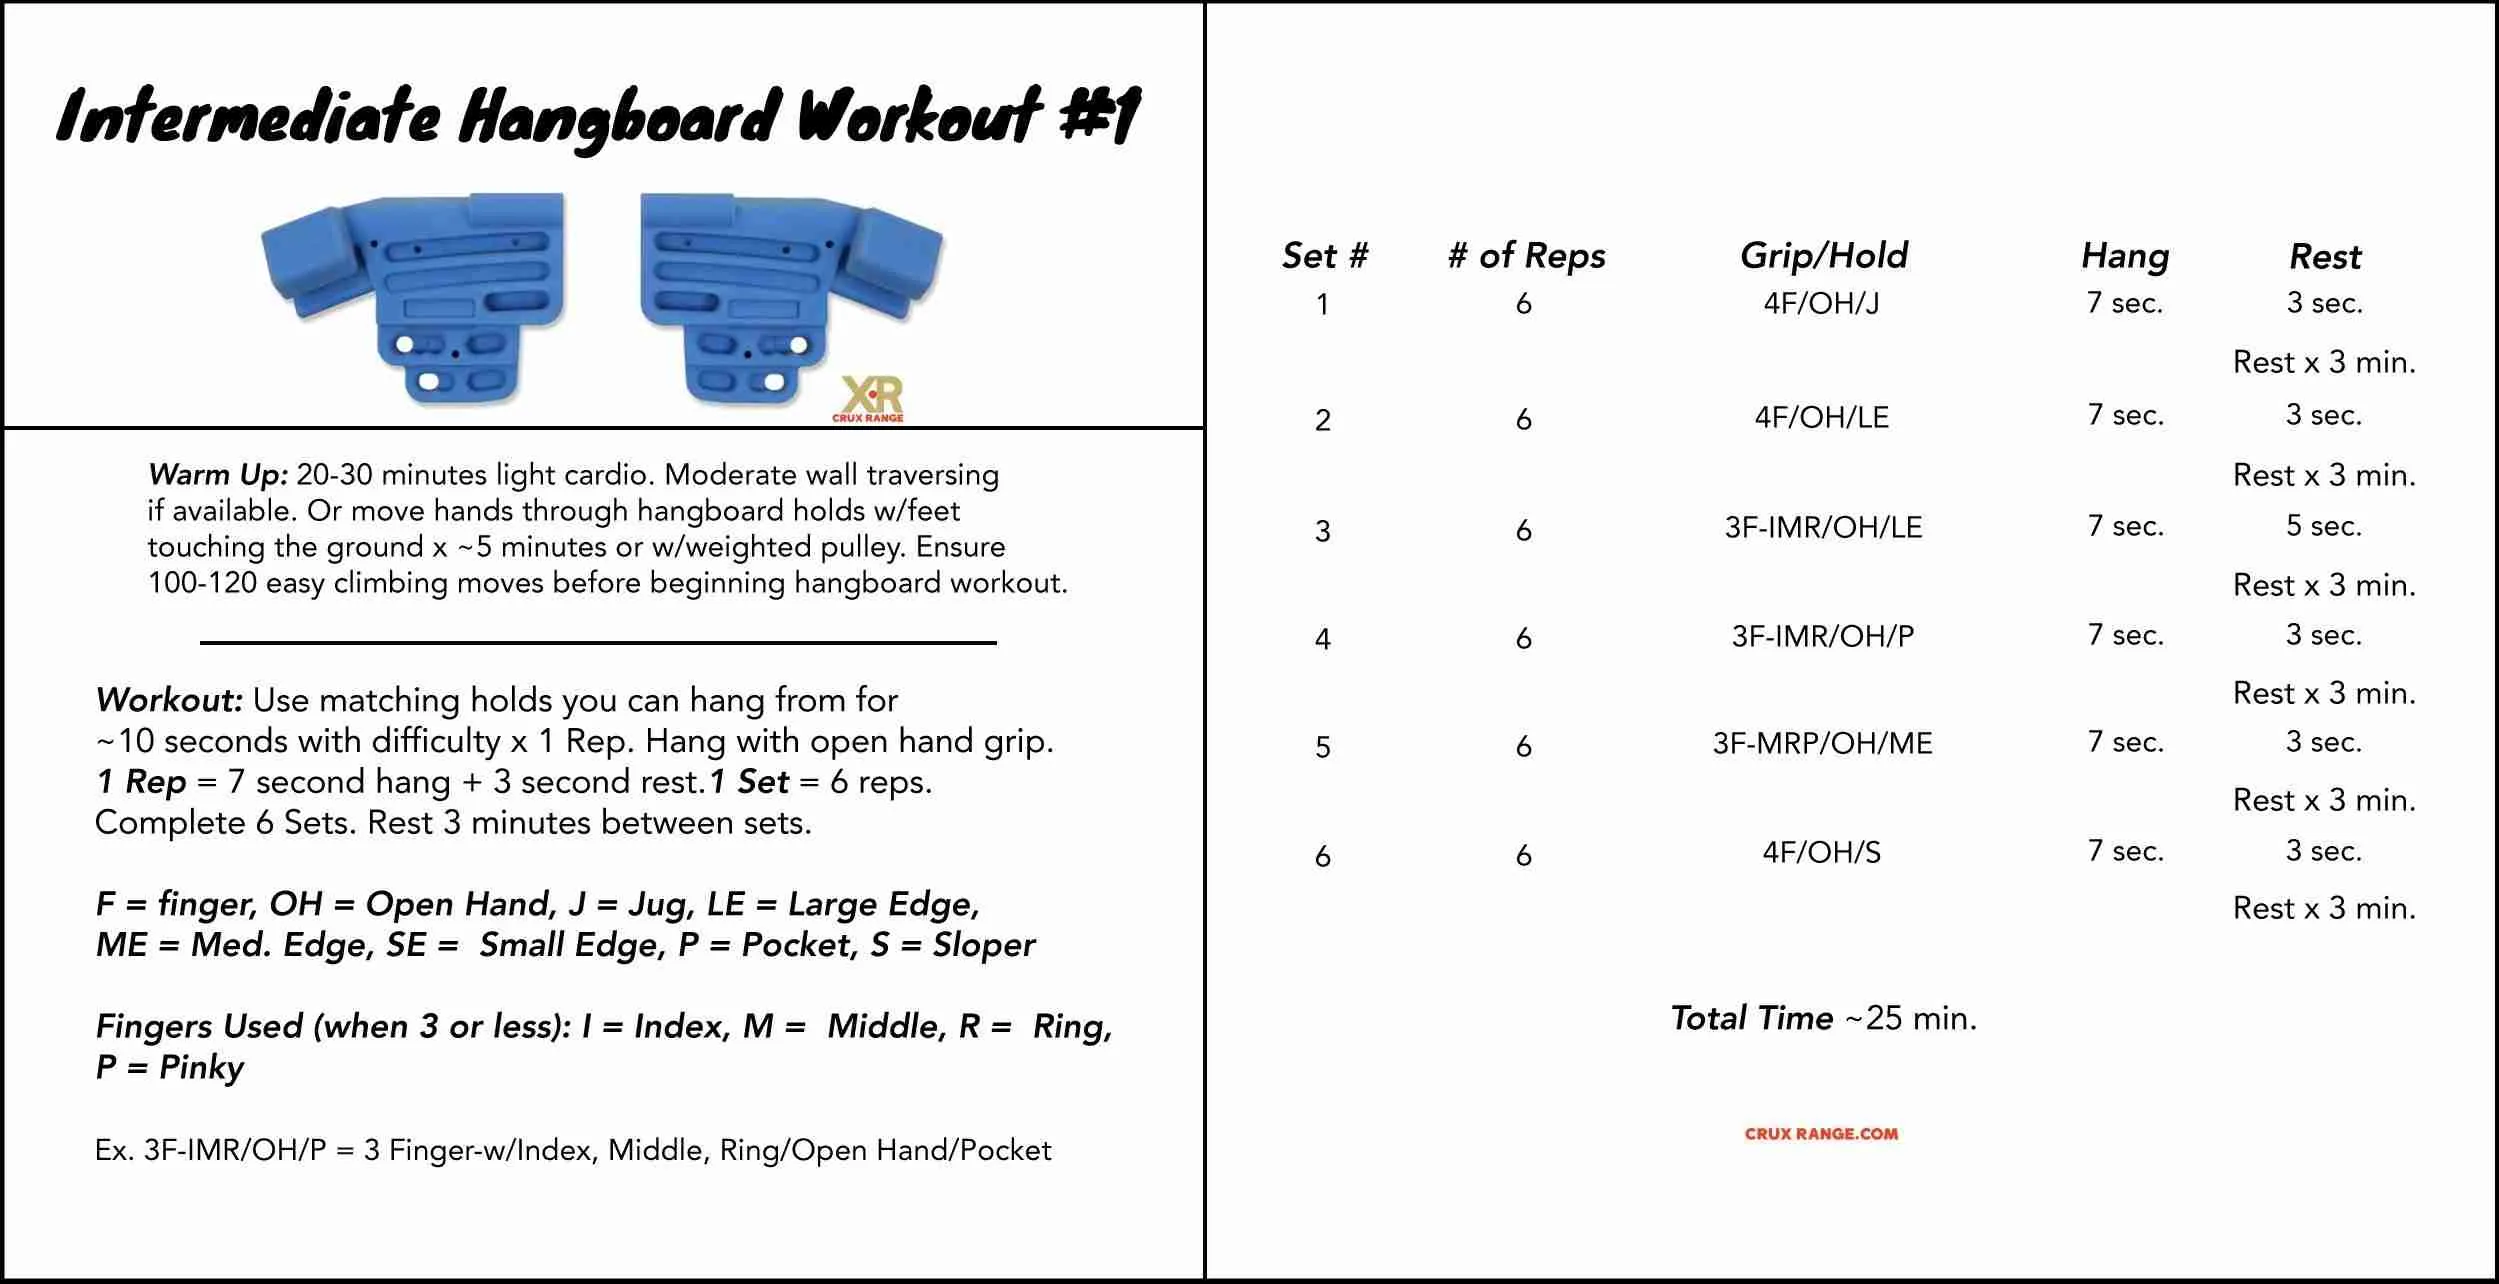
There are a few small changes that differentiate a beginner hangboard workout from an intermediate workout:
- Shorter rest times between reps
- Using smaller holds
- Starting to use less than four fingers to hang
- Alternating holds (ex. one hand on a jug with the other on a small edge).
At this point some people may choose to start adding weight or resistance (more on this below). However, we prefer the slow and steady approach.
To avoid injury, get to where you can easily do a full workout on some of your hangboard’s smaller holds before considering adding weight.
Using a pulley system can help you progress to the smaller holds more safely.
Intermediate Workout #1
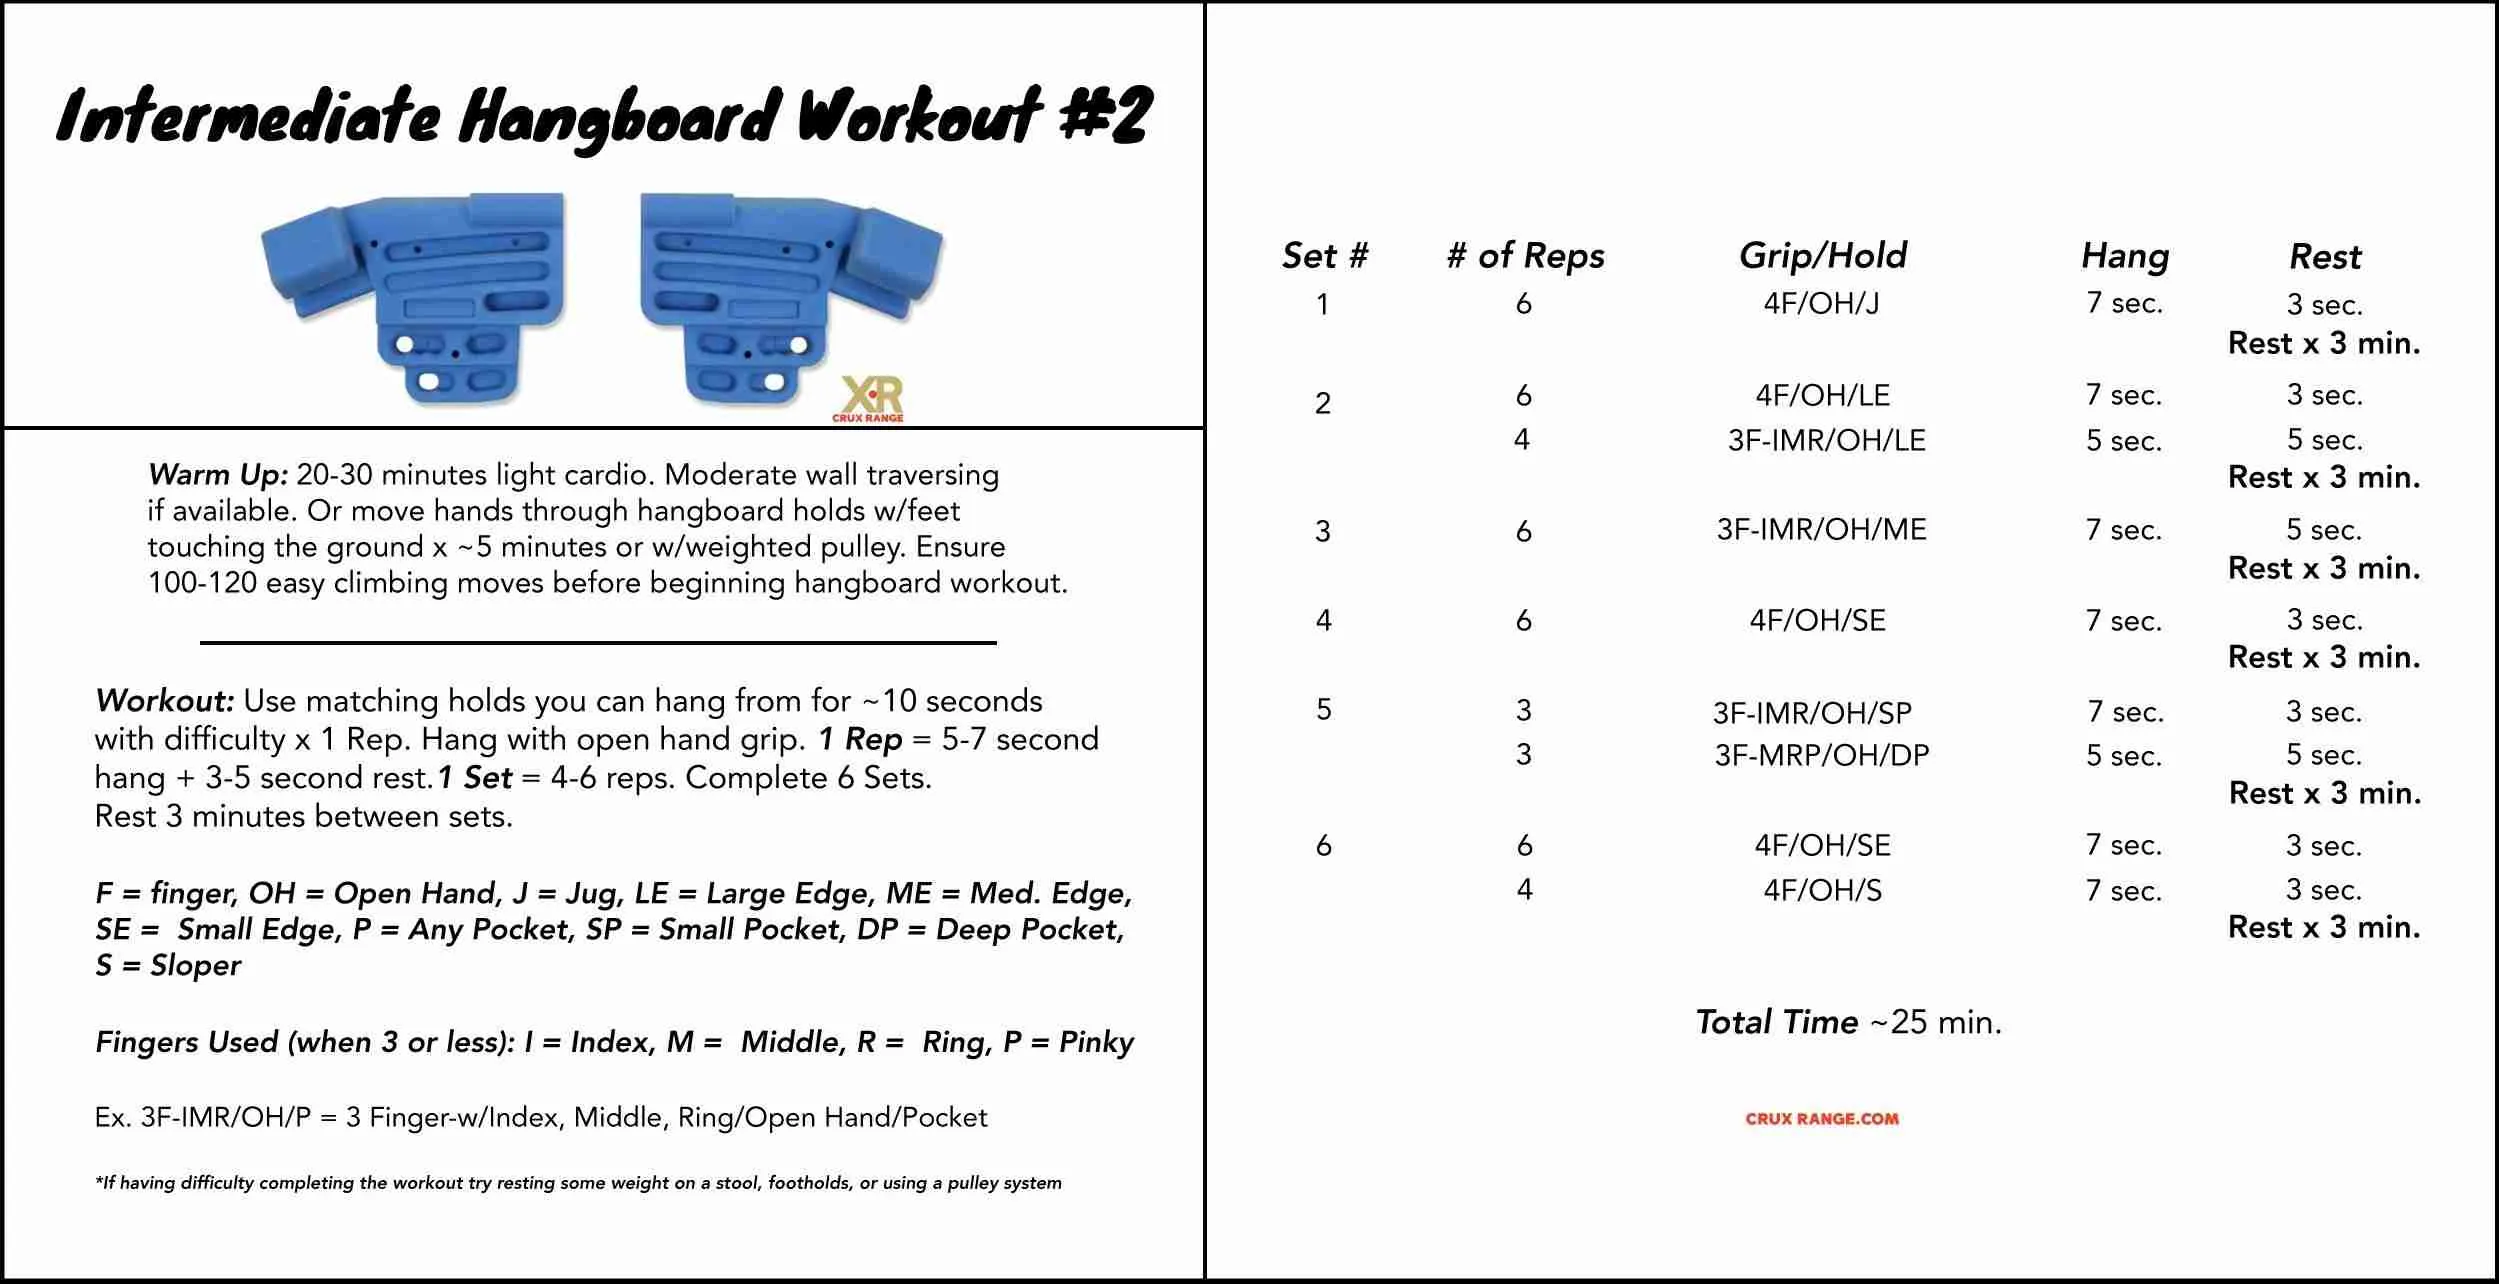
Intermediate Workout #2
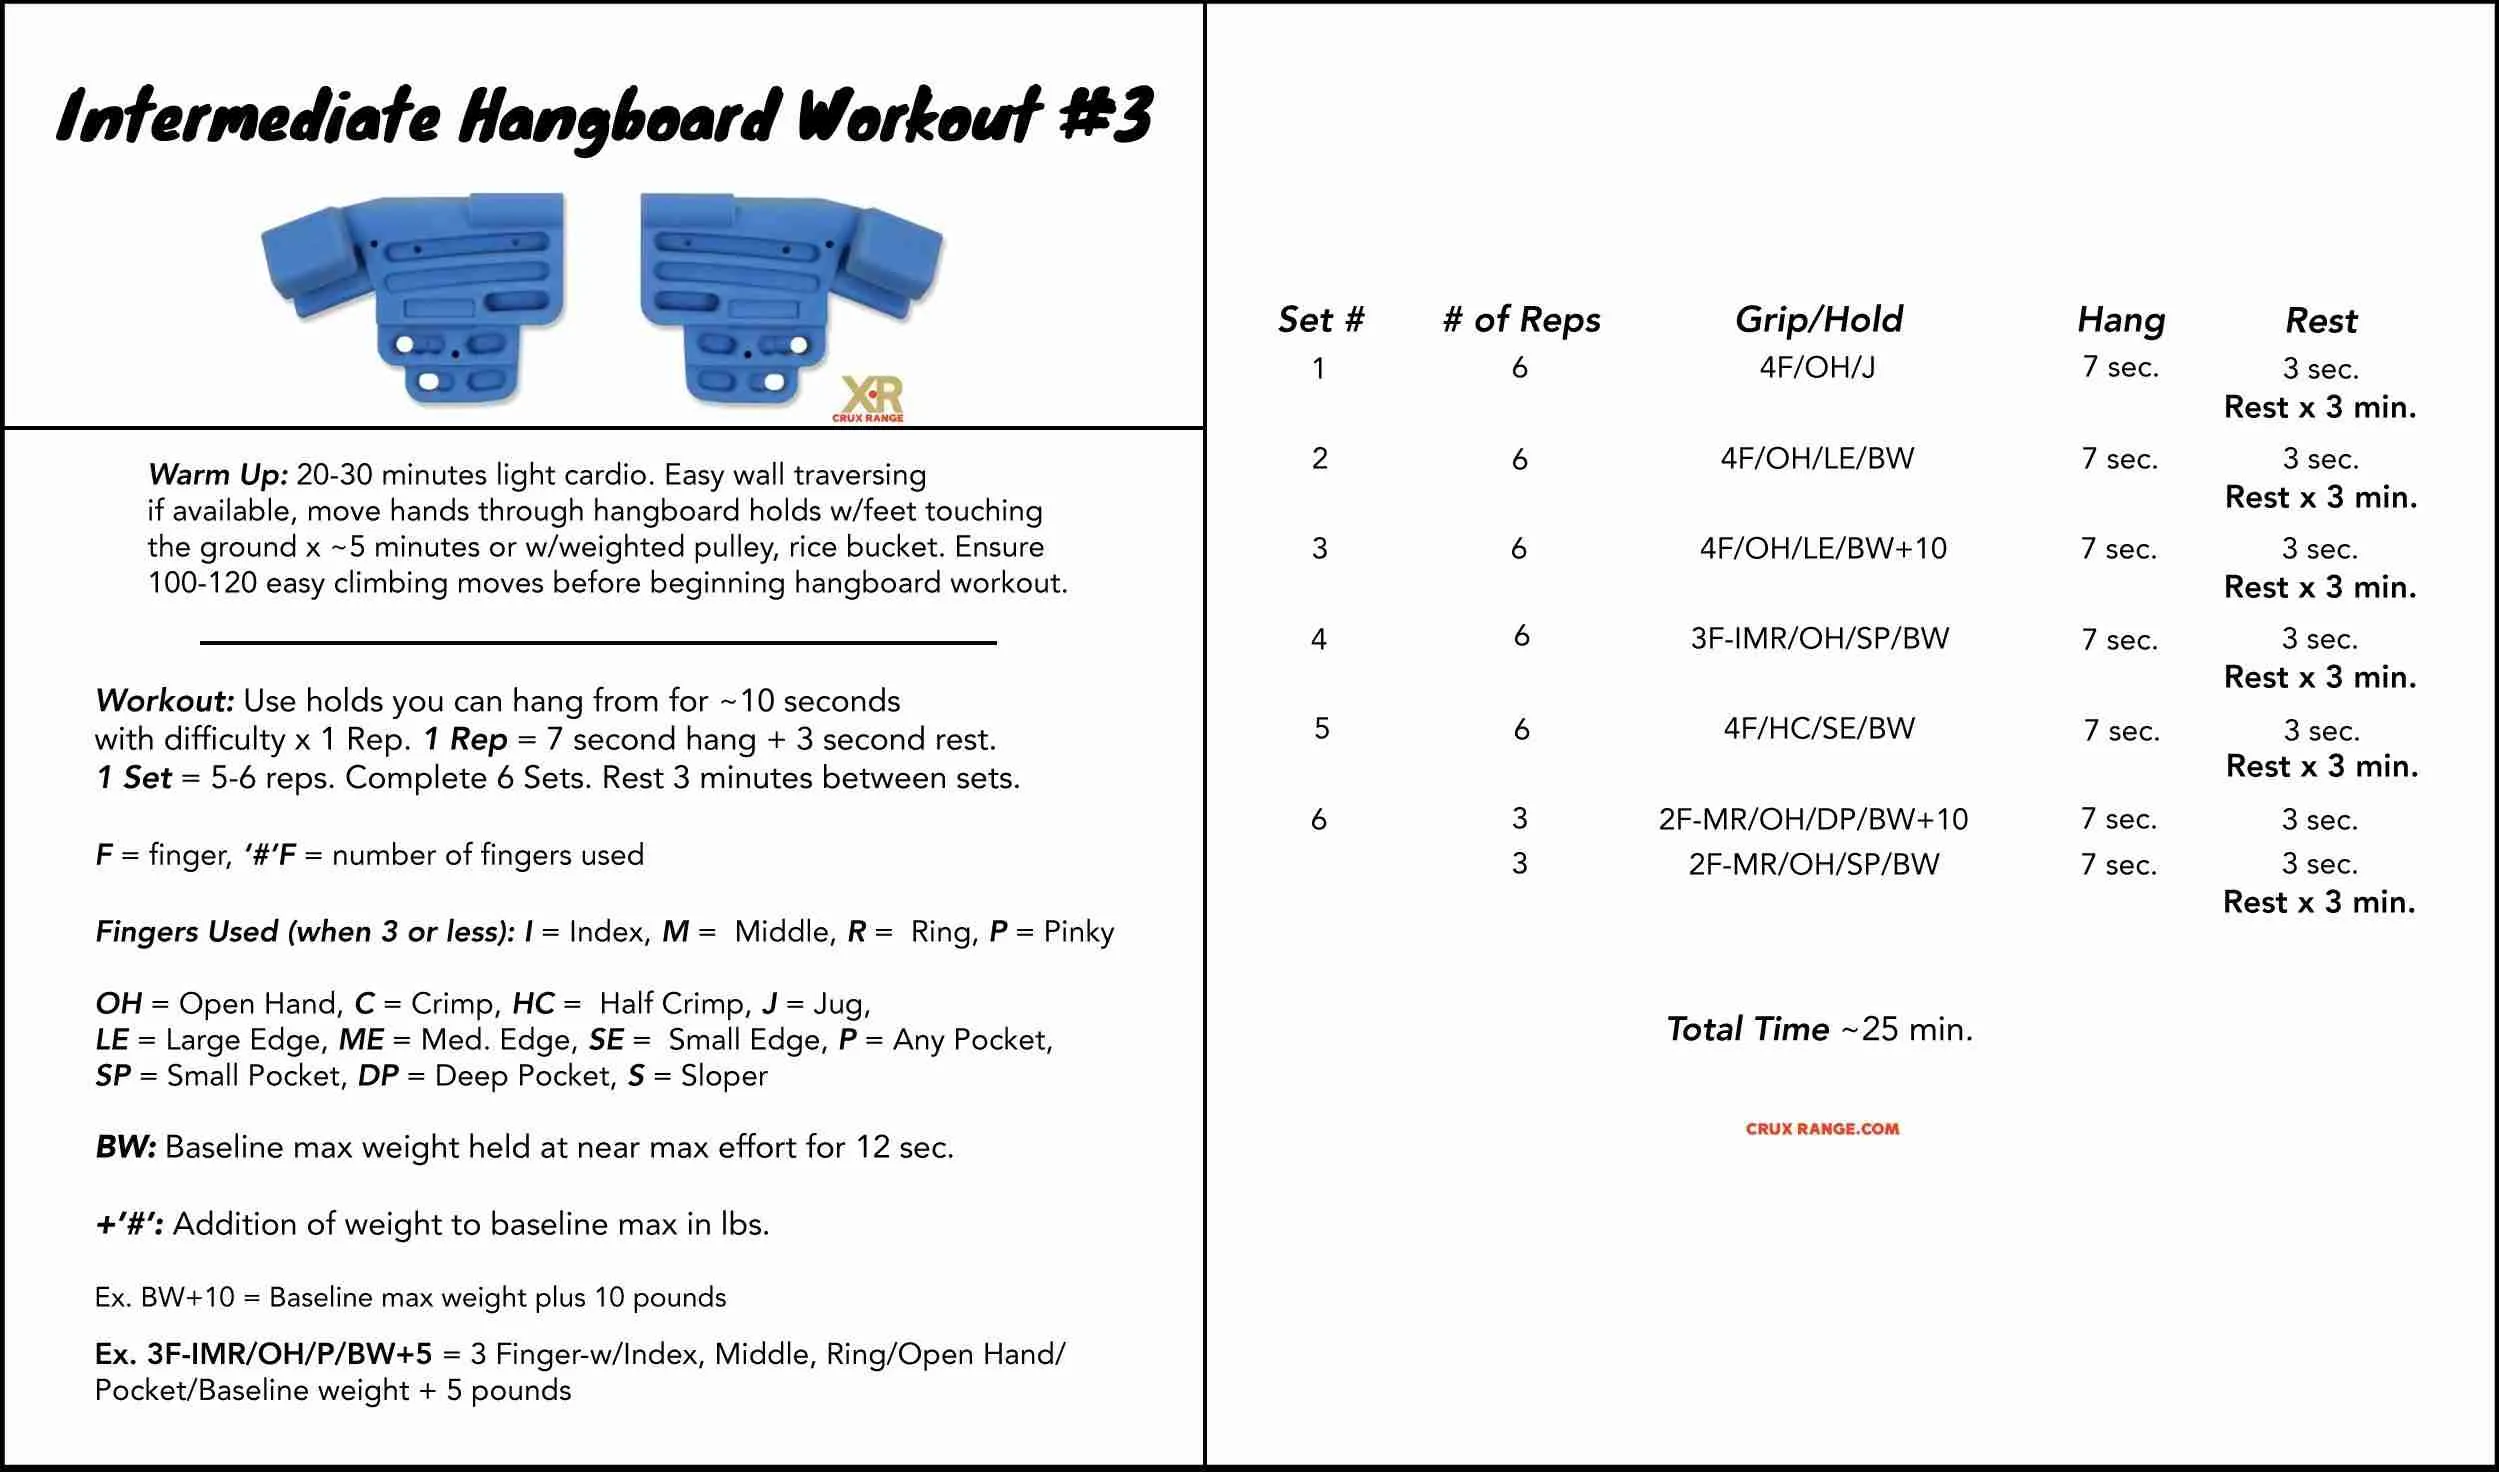
Intermediate Workout #3
The third intermediate workout requires adding weight to your hangs. There are a few ways you can do this; but the important thing is finding the right weight for you.
Again, go slow. You may not be ready for this step if you are still struggling without the added weight.
Dedicate an entire workout to finding your baseline max weight. Once you have that you can calibrate your workouts accordingly.
In the workout below and in the advanced workouts you will see indications to add a specific amount of weight to your baseline max.
This is a guideline. Listen to your body. Add or subtract weight as is appropriate for your level of strength.
Advanced Workouts
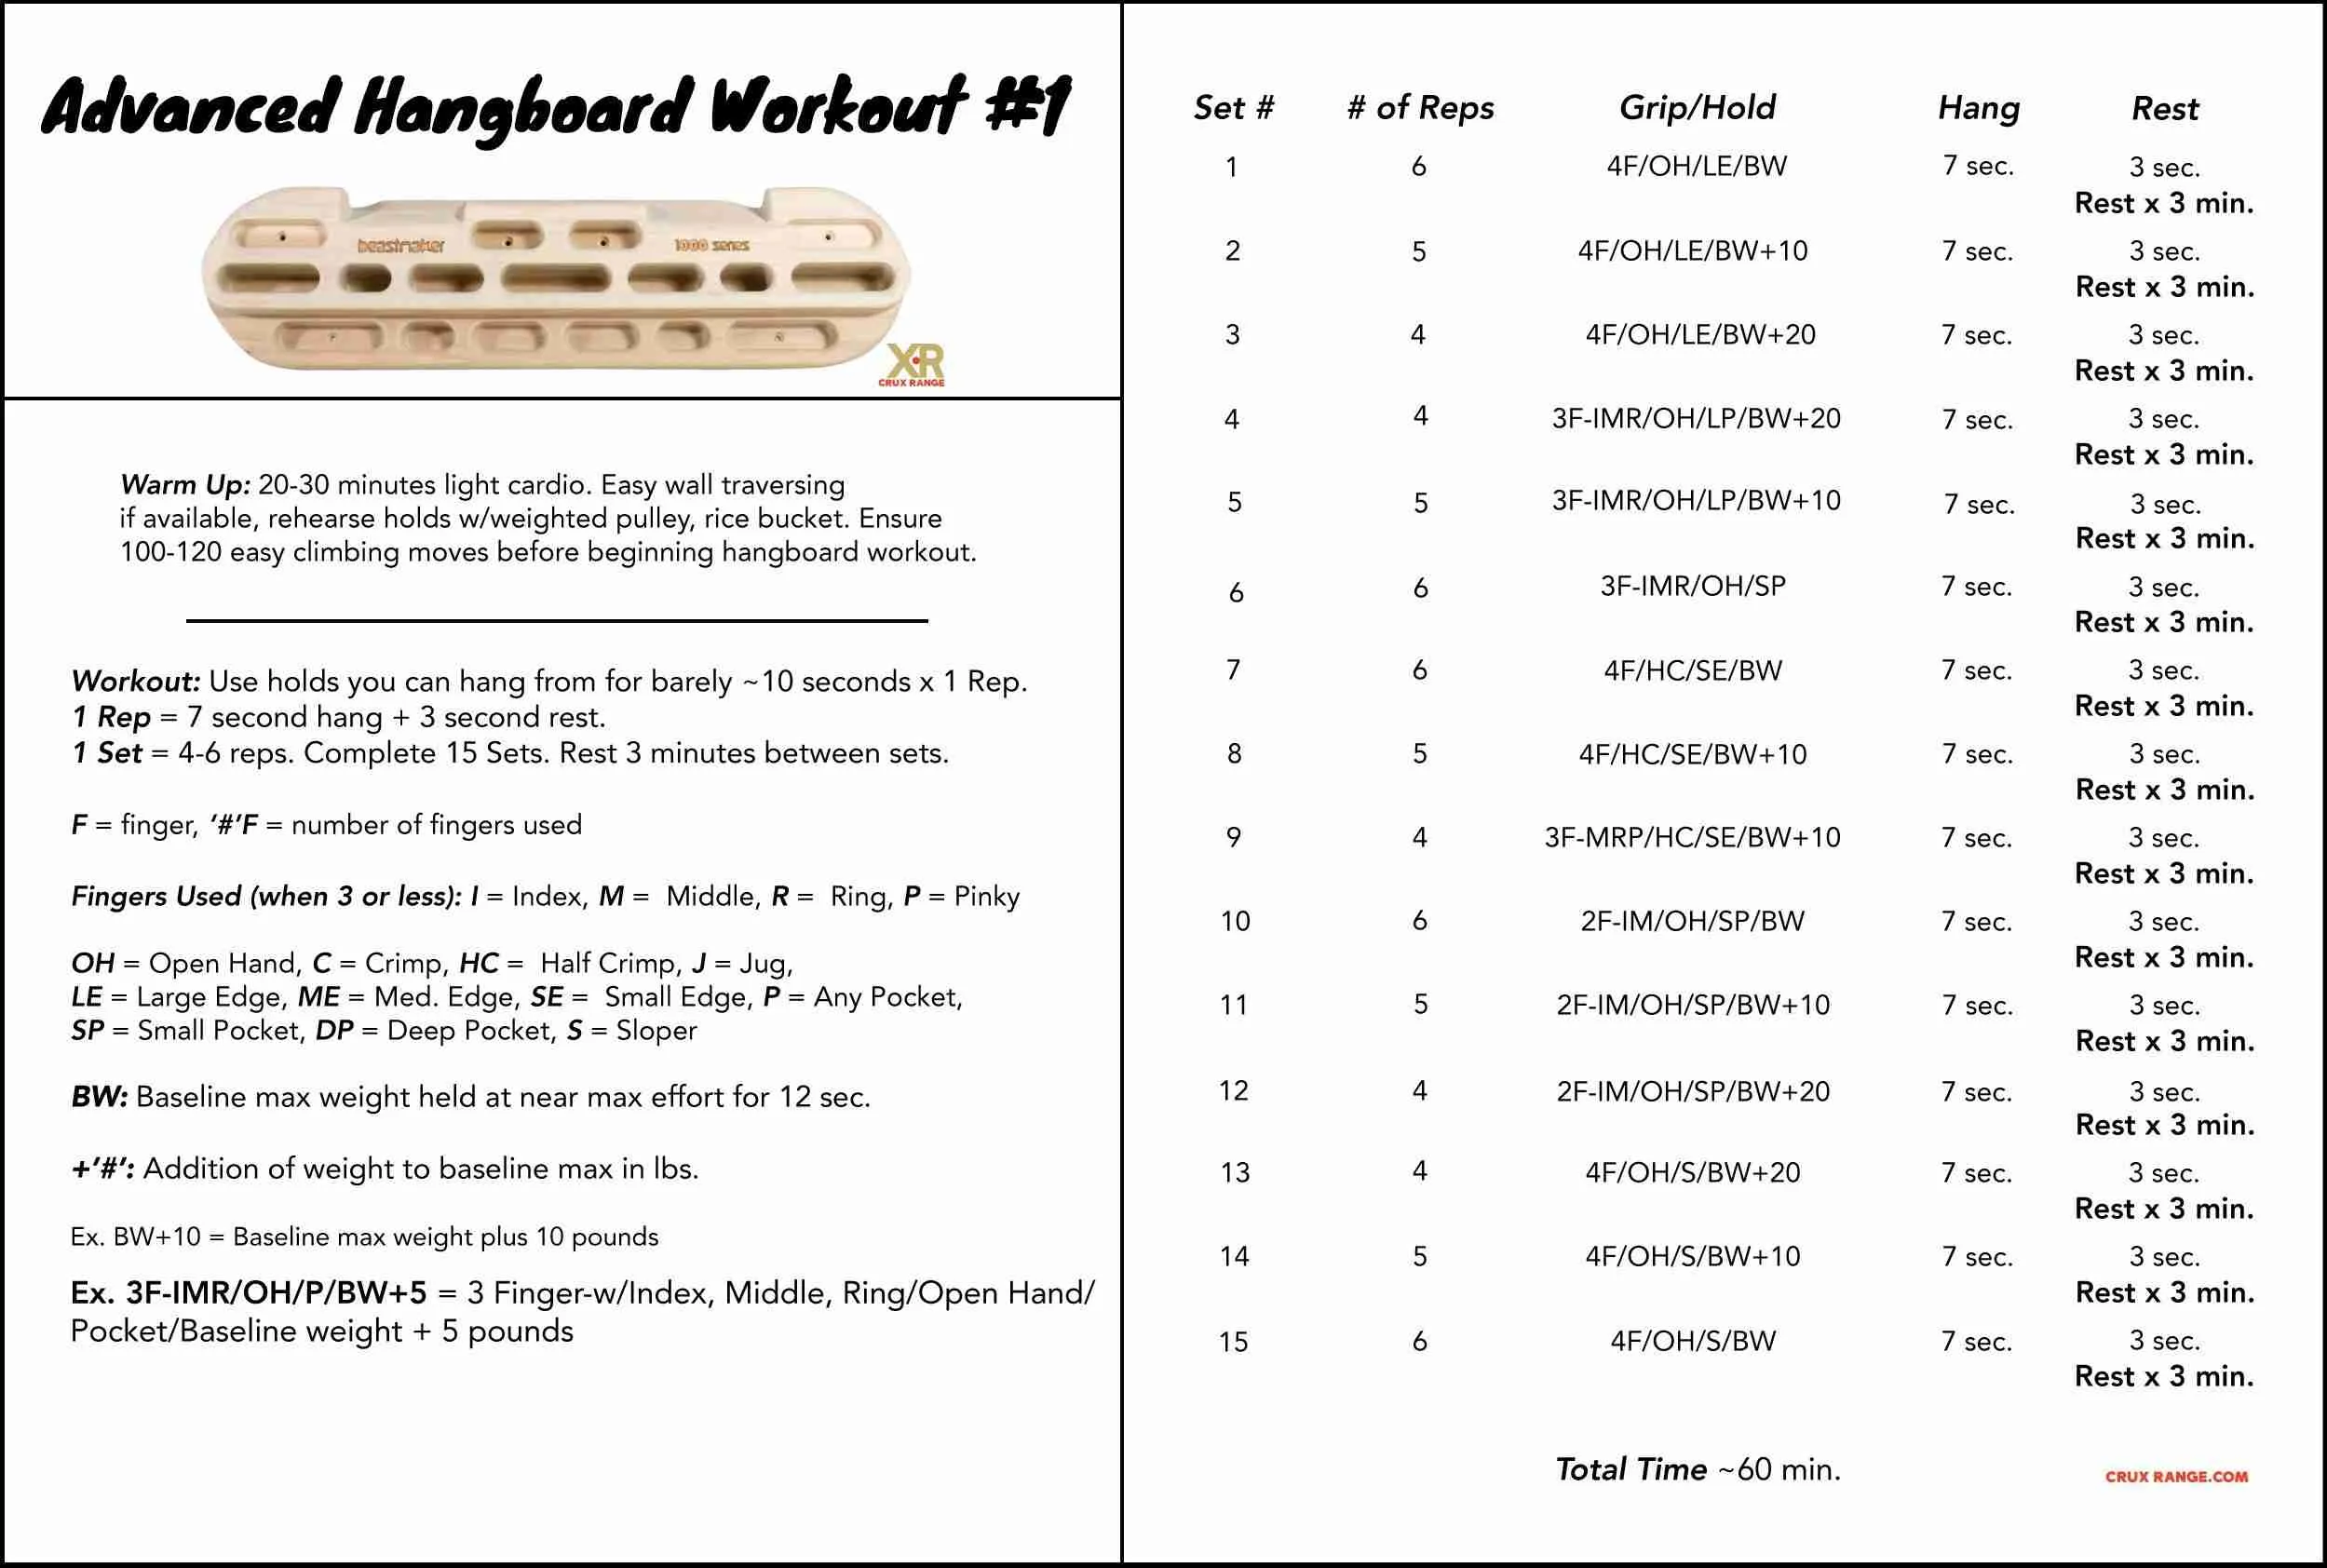
Advanced workouts use weight to increase workload. Adding weight is a proven way to accelerate finger strength.
Still, adding weight needs to be done conservatively and should only be done by advanced-level climbers.
If the weights used in the workouts below are too heavy–if you cannot complete the sets with the suggested amounts or feel overstrained–decrease to an amount you are comfortable with but still feels challenging.
To find your ideal added weight or baseline max weight; skip ahead for a simple method.
Advanced Hangboard Workout #1
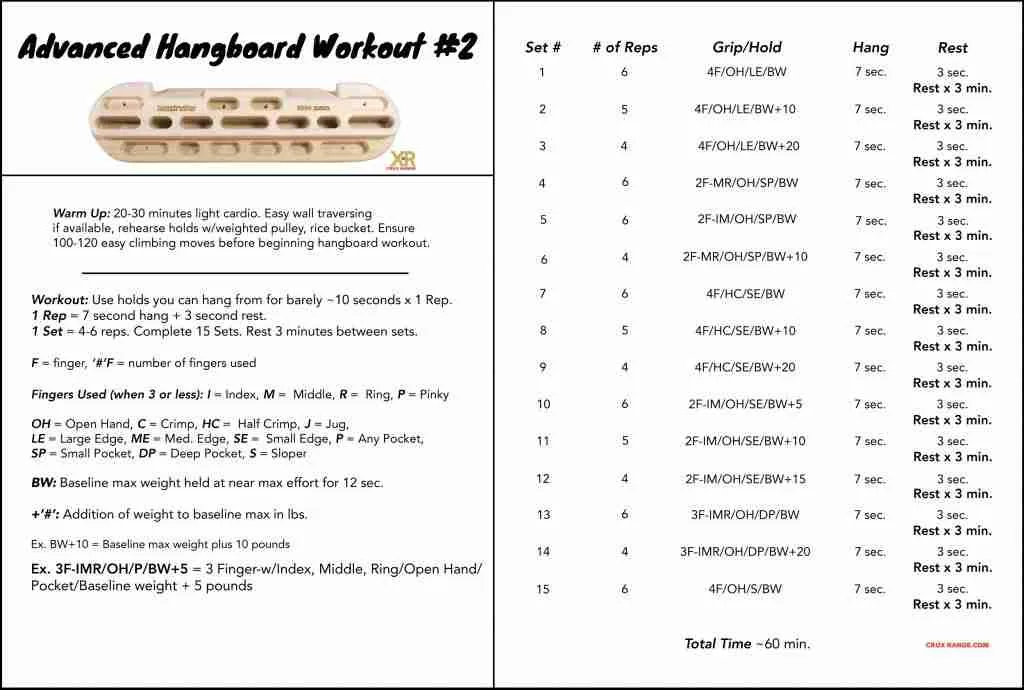
Advanced Hangboard Workout #2
Pulley Systems For Hangboard
Using a pulley system allows you to remove weight, making your hang easier.
You attach one end to your harness and add weight to the other end. The more weight on the opposite end of the pulley, the easier it will be to hang.

Pulley’s allow you train more difficult holds even if you aren’t yet able to hang your full weight from them.
This reduces potential for injury while allowing maximum strength progression.
All the components for a pulley setup can be bought individually at large hardware stores or online.
Companies like Trango also offer all-in-one pulley kits at reasonable prices.
Adding Weight
As you progress in your training you will start adding weight to your hangs.
In general, this is done by finding your max weight or baseline weight then adding or subtracting small increments from/to that amount during your finger strength workout.
Finding the right amount of weight is a bit of a balancing act and you will need to do it for each hold on your hangboard.
Dedicate a few training sessions solely to determining your max weight for each hold.
First, where exactly do you put the weight?
Two Ways To Add Weight For Hangboarding
The first and easiest way is to throw on a backpack and load it up with whatever you have; rice bags, weights, water bottles, etc.
This works but it is hard to be exact and the backpack straps can get in the way of your shoulders while hanging, potentially interfering with proper hanging form.
Second, the most common way is to use an old harness.
Get some plate style weights, put a piece of webbing through them, then clip that to a hard point on your harness allowing it to dangle between your legs.
Finding Your Max/Baseline Hangboard Weight
Choose your hold then add the smallest amount of weight possible to your harness.
Hang for 12 seconds.
Add more weight, hang again for 12 seconds.
Repeat the process until you reach near failure at 12 seconds. DO NOT hang to complete failure.
This is your max or baseline weight for that particular hold.
Alternating Holds
Alternating holds is another simple method to start training smaller holds when you don’t have access to a pulley system.
Grip a jug with one hand while placing your other hand on a challenging hold. Do your timed hang in this position.
Adjust the amount of weight you place on the smaller hold by weighting the jug less or more with your body positioning and tension.
It’s not an exact science but without access to pulleys you can still begin progressing safely to smaller holds.
Why Hangboard?
Ok, now you’re familiar with the workouts. Let’s cover the why and how.
Climbing requires strong hands and fingers. Duh, right?
But as you progress in climbing, as your technique and overall strength improve, you will naturally find your self hanging off smaller and smaller holds.
At this point, usually where we plateau as climbers, finger strength becomes a deciding factor.
Often, the difference between stepping up to the next grade and hang-dogging piece to piece comes down to how hard your fingers can crush smaller and more challenging holds.
More accurately, finger strength is the difference between good and great.
Hangboards are your gateway to climbing greatness; allowing you to focus your efforts purely on your digits.
There is no other workout that allows you to focus so acutely on this aspect of climbing strength.
As you will read below, fingers don’t actually have muscles so building up their strength can take time and a lot of work.
Still, implementing hang board workouts is worth it. Adding them to your training program is one of the most effective ways to step up your game for every type of climbing.
Does Hangboarding Actually Improve Climbing?
That is a fairly subjective question but most evidence points to yes.
If you look at elite climbers in the world today, one of the things they have in common is consistent hangboarding.
Remember at the end of Free Solo after Honnold is done with his epic accomplishment; they ask what he is going to do for the rest of the day. He says he’ll probably go do some hangboarding!
Ever watched Alexander Megos or high ball boulder hero Nina Williams training?
…Hangboards.
To learn more about Williams and how she trains to climb V13, check out Trainingbeta.com’s great article and podcast with the high-flying rock star.
Harder and harder climbing requires equal increases in finger strength. The mechanics of hangboarding has been scientifically proven to increase tendon strength over time.
So if your fingers rely on your tendons for strength, it would follow that increasing tendon strength would make your fingers stronger.
Put simply, all other factors being equal, yes hangboarding consistently and safely will improve your climbing potential.
But You Actually Can’t Strengthen Your Fingers
Anyone who has been climbing for a while knows that it takes a long time to increase finger strength.
The reason it takes so long is that your actual fingers don’t technically gain strength. Our fingers are made up of bone, tendons, and ligaments.
Increases in strength mean increasing tendon strength.
Anatomy Of A Finger
See your fingers don’t actually have any muscles in them.

Your palm and forearms have muscles and tendons/ligaments that attach to and activate the tendons attached to your finger bones.
Tendons transmit force to the bone, taking the strength of your muscles and applying it to your bones.
Pulleys keep your tendons in line with your bone so that the force of pulling is distributed evenly.

Think of tendons like the transmission in your car.
Your car’s engine (the muscles) creates force, then the transmission (tendons) transmits that force to the wheels (your bones) which do the moving.
Your pulleys (the joints, bolts, and belts) help direct the force where it is needed.
Pulleys: The most common finger injury
A pulley injury is one of the most common climbing injuries.
With hangboarding, there is a high risk for pulley injuries if you don’t warm up or have poor technique.
Crimping vs open hand grip will also increase your risk of pulley injury. More on this below.
According to one study, pulley injuries may require 2-3 months to heal and 4-6 months before full load-bearing capabilities return.
Starting a hangboard routine is great. But take it slow at first to avoid a devastating pulley injury.
Anatomy Of A Finger Pulley
As noted above, pulleys help keep your tendon where it needs to be. More or less, they are like zip-ties that keep your tendon in line with your finger bone.
Another analogy, suggested by Matt DeStefano, is that pulleys resemble the eyelets on a fishing rod.
As the rod flexes under the weight of a fish the eyelets or pulleys keep the line next to the solid structure of the fishing rod. This increases its strength.
In a pulley injury, there is often (though not always) an audible popping sound as the tissue breaks or tears under pressure.
The pulley tears or loosens, allowing the tendon to move away from the bone. In severe or multiple pulley injuries the tendon may do something called ‘bowstringing.’

A2: The Most Common Pulley Injury
There are 5 pulleys in each of your fingers, numbered A1-A5. Closest to your palm is A1 and near your fingertip is A5.
Most common for climbers, is an A2 pulley injury. This is the pulley closest to your knuckles, the ones exposed when you make a fist.
A2 injuries are more common due to a few anatomical intricacies and how force is distributed in your fingers when loaded.
Crimps Increase Potential Injury
You don’t really need to focus on the anatomical details. What is valuable to understand for climbing—and hangboarding in particular—is that crimping puts an estimated 31.5 times the force on your A2 pulley versus using an open-handed grip.
Further, as The Climbing Doctor proves here, moving off of a crimp dynamically as you would while climbing a route, increases the force on your pulleys even more.
In this simple experiment, he found that the force on fingertips increased by ~62% when pulling off a crimp.
We go more into pulley injuries and how to rehab and tape up for them in another article.
For now, just know that they are a real risk that can put you out of the game for a while.
Train smart to avoid an injury.
Tendons Grow Slow
Tendons don’t get as much blood flow as muscles. They also respond better to resistance training than pure weight training like a muscle.
Strengthening tendons takes much more targeted and repeated effort than building up a muscle.
Within days, a muscle can grow in response to a stimulus.
Studies to determine tendon strengthening, however, suggest that it takes approximately 2 months for tendons to start strengthening in response to stress.
What does this mean for climbers and hang boarding?
You won’t see results right away.
But if you stick with a consistent hang boarding routine, after a few months, you will start realizing impressive gains in overall finger strength.
Hangboarding is a consistent form of resistance training targeting strengthening of the tendons responsible for your finger strength.
Obviously climbing isn’t only about your fingers, but if you can’t hang on the holds you won’t ever get the chance to use your fancy footwork or hulk-like back and shoulder strength.
Want to break through your current plateau or be more a more consistent climber at your grade?
Start hangboarding today!
It’s simple, inexpensive, and (as shown in the routines above) takes very little time.
Preventing Injury
Other common injuries from hangboarding include but are not limited to elbow, wrist, and shoulder injuries.
Hangboards are not intended for pullups. If you insist on using your hang board for pullups, do not do pullups off small edges or crimps.
Max duration hangs and long weighted hangs are a valuable part of training, but avoid hanging until complete failure. This will increase your risk of injury.
Now that we are all ready to get on the hang board but are terrified of getting a pulley injury let’s learn how to prevent these injuries through adequate warm-ups and the proper hangboard form.
3 Ways To Warm Up For Hangboarding
One of the best ways to warm up for climbing in general is by doing 20-30 minutes of cardio.
If you don’t have time for 20-30 minutes try to get at least 5-10 minutes of cardio in before starting your hangboard workout. This increases blood flow—improving performance and decreasing the risk of injury.
For outdoor climbing the approach hike usually takes care of the cardio warm-up for you.
When training at the gym or on your home hangboard jump rope is the most space-efficient way to warm up.
You will get your heart rate up while also gently warming the muscles in your forearms and wrists.
Don’t forget to cool down at the end of your workout. Cooldowns also help prevent injury. Do some light finger and wrist stretches or a few easy routes.
If you have access to a rice bucket or Flexbar (described below), do a set or two of easy exercises.
1. Warming Up On The Hangboard
According to a 2012 study, the optimal warm-up is 100-120 easy-climbing specific movements.
The authors recommended 3-4 easy routes of ~40 moves or 8-12 easy boulder problems.

If you don’t have access to a climbing wall or outdoor bouldering, you can still warm up on the hangboard, provided it has a few easier/juggier holds.
Stand with your feet touching the ground. Use a stable platform or step stool if your hangboard is too high to touch the ground while hanging.
Start on the easiest holds weighting them only briefly—1/2 to 1 second.
Move your hands one at a time from hold to hold; simulating the hand movement of climbing a route.
Ensure that you are not putting your full weight on your hands at any time.
Keep moving from hold to hold for a few minutes. Take a break and repeat 2-3 more times for a total of ~10 minutes or 100-120 movements.
Go slow, trying not to fully weight your fingers until they are completely warmed up.
2. Rice Bucket
Another great way to warm up your hands; rice buckets.
All you need is a bucket and a bag of rice!
This popular powerlifter’s exercise is highly applicable to climbing. Rice buckets are a simple and cheap addition to any home gym.
Use it as a warm-up, a warm down, or as a strengthening workout on its own.
The videos below explain the exercises in more detail.
Rice bucket exercises help increase finger and wrist dexterity; increasing strength and preventing injury.
Done right, you will get a little forearm pump from these workouts.
3. Bands
The Black Diamond Forearm Trainer and the Metolius GripSaver are great devices for warming up and strengthening your fingers.
However, you don’t really need anything fancy.
Grab a heavy rubber band like the kind you find on vegetable bunches.
Pinch your fingers together, placing the band over the tips of each finger (near or over the cuticle area).
Slowly extend and contract your fingers a few times spreading your fingers apart.
Maintain a straight wrist throughout the movement.
Next, spread your fingers and hold that position for 3-5 seconds. Repeat this for a set of up 5-8 repetitions on each hand. Do 3-5 sets total.

Exercise Bands For Wrists
To warm up your wrists, extend your hands in front of you vertically like doing a Karate Kid style chop. Keep your elbows at your sides, making a 90-degree angle with your arms.
Take an exercise band/resistance band or similar, looping it around your hands but under your thumb.
Push outward with your hands to keep resistance in the band. Keep your wrists straight.
Now, slowly turn one hand inward and outward approximately 1/4 turn in each direction.
Ensure you maintain tension in the band by gently pushing outward with both hands while turning.

A similar wrist warm-up can also be done with the Theraband Flexbar. More on this versatile tool below.
Elbow Warmup & Injury Prevention
The Theraband Flexbar offers one of the best exercises to warm up your elbows and help prevent injury.
If you haven’t come across them, Flexbars are inexpensive, portable, packable, and extremely versatile. Most often used in the context of physiotherapy or rehab, they are great tools for warming up and strengthening arm tendons.
The video below explains a full range of climbing-specific exercises.
Proper Hangboard Form
After warming up, the next key factor in injury prevention is the proper hangboarding technique.
Finding the proper form is easy enough. Focus on a few key components:
- Keep your elbows slightly bent. Never allow them to fully lock out.
- Maintain shoulders pulled down and back. Squeeze your shoulder blades towards each other with your head up.
- Shoulders should not touch the sides of your head.
- If your ears are touching your shoulders you are hanging too much.
- Hold overall body tension with an engaged core. Your lower body should not swing or sway.
- To start, try keeping your feet or toes lightly touching the ground.
This is what your body should and should not look like while hanging:

Types Of Hangboard Grip
There are a few primary grips you can use when hang board training. Primarily an open hand, half crimp, full crimp, and pinch.
Open hand grip is the best for avoiding injury.

Here is the difference between a half crimp and a full crimp.

Pockets

Monos

Slopers

Images via 99Boulders.com and Trainingbeta.com
For most beginner to intermediate climbers, it is best to avoid hangboarding with full crimps.
Remember, a full crimp puts ~31% more force on your tendons, making you more prone to debilitating injury.
Many people worry that not training full crimps on the hangboard will limit their strength progression. This is not true.
An open hand grip will still increase your crimp strength. Similarly, slopers will help increase your open hand and crimp strength but not the other way around.
For this reason, slopers are ideal for the end of a workout when your fingers might be sore from edges or need a change in positioning.
Here is a quick video from Power Company Climbing summarizing what we just covered:
Hangboard Before Or After Climbing?
As you probably noticed by now, handboarding puts a lot of stress on your fingers.
We already discussed how important it is to warm up. Still, many people want to know if it is better to hangboard before or after a climbing session.
There are arguments for both camps.
As climbing doctor Eva Lopez suggests, to get the most out of your finger board workout, doing it before climbing is ideal.
Others more focused on injury prevention suggest that post-workout hangboarding is best if you must combine them.
On the other hand, many climbers keep hangboarding and finger specific workouts completely separate from their regular climbing.
Isolating hangboarding and/or finger strength specific workouts to their own days will help you get the most out of your routine while avoiding injury.
Ultimately this decision will come down to why you are hangboarding in the first place.
Before Climbing
Some people will use hang boards in a modified way to warm up for actual rope climbing or bouldering.
This might be the case at a crag with no warm-up level routes or at a gym with no warm up level boulder wall.
You may have seen people at your local crag or in videos hanging off something like the Metolius Light Rail.
This is a great option when you don’t have access to easy climbing.
For beginners, if you are going to use this method, always ensure you properly warm up with some of the exercises outlined above.
Hangboarding before a workout will allow you to get the maximum benefit while your fingers and forearms are still fresh.
After Climbing
Hangboarding after a climbing session can be a great way to get a full burnout.
Training on the hangboard after climbing means your fingers are either going to be tired or well warmed up.
In the case that your fingers are tired, focus on proper technique to avoid injury. Do not use full crimps or hang to complete failure.
Separate Hang Board Only Training
Ideally, you can choose a day to focus entirely on finger strength training.
This might mean some light bouldering, hangboarding, and campus boarding.
Climbers often work weight days into their climbing fitness routine. These days mix well with finger strength training.
Sonnie Trotter offers a good example of a full finger strength workout below (he does campus board to start with the hangboard towards the end):
Dedicating one day exclusively to finger strength training like the hang board will allow you to get the most out of the exercises while reducing injury potential.
Now that you know how to properly use a hangboard, it is important to choose the right hangboard for your level of climbing ability.
How To Choose A Hangboard
The main considerations when choosing a hangboard are:
- Plastic vs Wood
- Size of holds
- Variety of holds
- Specific to your project
Plastic vs Wood
Currently, there are two main types of hangboards; plastic and wood.
The main difference between the two materials is the variety of holds. Plastic can be molded into any shape imaginable while wood is more limited to edges and pockets.
Plastic boards are made of either Polyurethane or Polyester Resin.
There is not a huge difference between the two plastics.
Important to note; Polyurethane is much lighter but can be a bit more rough on the skin.
Wooden boards offer a more aesthetically pleasing option and are much easier on the fingers.
Holding or gripping wood finger boards is slightly more difficult than on the textured plastic boards. In terms of training, this can be a good thing.
However, keep this in mind if you are new to hangboarding. You don’t want to purchase a solid wooden hangboard like the Beastmaker 2000 only to find the holds are too difficult to hang off.
Overtime wooden boards’ pores can get gunked up with chalk and finger grease. Wooden hangboards will require a bit more maintenance than plastic ones which can be dry-brushed clean just like a regular hold.

Size Of Holds
The difference between a beginner’s hangboard and one for high-level climbers comes down to the size of the holds or edges.
Whatever your current level of finger strength, find a hangboard that allows you to progress.
Look for something that has at least 2-4 holds you can easily hang on for 10-20 seconds and at least 2-4 that you can only hang on for a few seconds.
Even if you are an advanced climber, find a board with a few easy to jug sized holds. You will need these for warming up, the end of your workout, or when you begin adding weight to your hangs.
High difficulty finger boards like the Beastmaker feature mostly small edges and pockets that the beginner to intermediate climber will struggle with.
Metolius’ Project board is an example of a beginner’s hangboard. It offers a decent variety of larger holds with a progression to medium-sized edges while also featuring jugs and two types of slopers.
The Trango Rock Prodigy is an extremely versatile hangboard that can accommodate climbers from beginner to expert. The rails taper down, providing full pad holds down to tips only edges.
Ideally, choose a hangboard with the largest variety of edge sizes in and just beyond your ability range.
Variety Of Holds
Most hangboards focus on edges and pockets.
When looking at the types of holds a board features, you really have two options; pick one that has a variety, or choose one with holds specific to your project or local climbing area.
For example, if you climb in Greece and your project is an overhanging tufa route, find a board with some open-handed and pinch holds liked the Iron Palm.
If you mostly climb Smith rocks or the Buttermilks, then you’ll want a board with lots of small edges. The Transgression board might be a good option.
Someone who is hangboarding to improve overall finger strength will want something with the most variety of holds within their ability range.
How To Hang A Hangboard
All hangboards need to be mounted according to manufacturer guidelines to ensure your safety.
Keep in mind that you will need to drill holes and crank down a few screws when installing your new hangboard.
Above doorways are the easiest and most convenient location.
Always secure your hangboard to multiple structural beams or frame-studs as shown in the image from Metolius below:

If you do not want to or cannot drill into your walls, there are other options.
A home pullup bar like the Iron Gym can be easily modified to hold a hangboard.
This system allows you to mount a wooden board on one side which the hangboard screws into rather than screwing into the wall.
The setup can quickly and easily be taken down and put back up for use in small or shared spaces.
Follow the instructions in this video, or step by step instructions from The Better Climber Project.
For those who would rather skip the DIY aspect, Blank Slate Climbing offers pre-made doorway setups similar to the one in the video at reasonable prices.
For those of you with the space in your home and the construction know how; there are also these freestanding mounts. Chris at Seeking Exposure gives a detailed construction guide here.

Conclusion
Hangboarding is one of the most effective ways to increase finger strength for rock climbing.
There are many different types of hangboards and hangboard workouts.
Ensure that you start slow and easy, gradually working your way up to smaller and smaller holds.
Take time to warm up before any hangboard workout.
Include cardio as well as finger specific warm-ups such as light bouldering, unweighted movement around the hangboard, rice bucket pulls or band exercises.
Proper technique is critical. Always maintain a slight bend in your elbows with your shoulders pulled down and back.
Maintain core tension throughout your hangs.
Full crimps put a significantly increased amount of force on your fingers; increasing your risk of a pulley injury.
Unless you are an expert level climber keep your hangboarding to open handed and sloper grips.
Pulley injuries are the most common climbing injuries. Pulleys wrap around your finger bones and tendons to keep the tendons aligned with the bone.
Your fingers do not contain muscles. Their strength actually comes from the tendons and ligaments attached to them which are activated by the muscles in your forearms and palms.
Tendons take much longer to strengthen than muscles.
As a result, noticeable progress—with consistent training—may take up to 2 months or longer.
Choose a hangboard with a variety of holds appropriate to your level of climbing.
There should be some that you can easily hang from for 10-20 seconds as well as some that are currently difficult to hang from for more than a second or two.
Wooden hangboards offer a softer platform for your fingers but keep in mind they will be harder to grip than the more common plastic hang boards.
When putting up your hangboard be sure to follow the manufacturers instructions. Hangboards should be attached securely to framing or beams.
If you can’t drill holes in your walls or beams try a modified doorway pull-up bar. You can also make a similar DIY setup with other pull up bars–as shown above.
Training finger strength is hard on your body. Always warm up thoroughly and rest adequately.
As the ever-strong Anderson brothers say, “Training makes you weak! […] Rest after training makes you strong.” Even these legends of optimizing performance rest 2 days between hangboard workouts.

Hangboarding For Health
Its never too late to start hangboarding.
This new era of social distancing presents the perfect opportunity to start a simple habit that will propel your climbing to the next level.
How do you hangboard?
Have any tips for beginners?